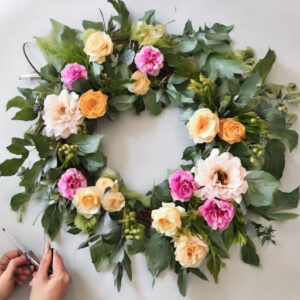
Spring is a season of renewal, growth, and vibrant colors. One of the simplest yet most beautiful ways to celebrate the arrival of spring is by crafting a floral wreath to adorn your home. Not only does a floral wreath add a welcoming touch to your front door, but it can also bring the joy of spring indoors.
Creating a wreath can be a fun and rewarding DIY project, even for those without prior crafting experience. This guide outlines five easy steps to help you create a stunning floral wreath that captures the essence of spring.
Step 1: Gather Your Materials
The first step in creating your floral wreath is to gather all the necessary materials. Here’s a comprehensive list of what you will need:
Materials:
Wreath Base: There are several options available, such as grapevine, foam, or straw wreath forms. For a spring floral wreath, a grapevine base is recommended for its natural look and ease of attachment.
Floral Wire: This will be used to secure flowers and accents to the wreath base.
Wire Cutters: Essential for trimming floral wire and stems.
Floral Tape: Useful for securing delicate flowers.
Artificial Flowers or Fresh Flowers: Choose a variety of flowers that reflect the vibrant colors of spring. Consider using a mix of larger blooms, such as peonies or daisies, along with smaller accents like tulips or daffodils.
Greenery: Incorporating greenery such as eucalyptus, ferns, or ivy will add depth and texture to your wreath.
Accessories: Consider adding elements like ribbons, berries, or butterflies for additional flair.
Hot Glue Gun (Optional): For added security, a hot glue gun can be useful for affixing flowers or embellishments that might not stay secure with the wire alone.
Once these materials are gathered, it’s time to begin crafting your spring wreath.
Step 2: Prepare Your Florals
Preparing your flowers is essential for achieving a beautiful final product. If you are using fresh flowers, trim the stems to approximately 6-8 inches in length. Remove any leaves that will lie below the line of attachment, as they can create unnecessary bulk and detract from the overall aesthetics.
For artificial flowers, cut the stems to your desired length, ensuring they can fit well onto your wreath base. Take a moment to arrange the flowers in groups or clusters on a table to visualize how they will look on the wreath. This is a key step in the design process, allowing you to play around with spacing, color coordination, and flower types.
Tip:
When choosing your flowers, consider the color scheme. Spring is synonymous with pastel hues, but don’t shy away from vibrant splashes of color, too. Experimenting with different textures, like the softness of peonies alongside the delicate coolness of lavender, can create a true spring vibe.
Step 3: Attach the Flowers to the Base
This step involves intimately connecting your carefully chosen florals to the wreath base. Begin by laying your flowers around the wreath to determine the best placement before actually securing them. Start with larger focal flowers—these will create your centerpiece and structure of the wreath.
Instructions:
1. Choose a starting point: Secure the first large flower to the wreath using floral wire. Thread the wire through the stem and attach it to the wreath base, twisting it tightly to hold it in place.
2. Building Outward: Progress by attaching additional large flowers in a spaced manner. Make sure to rotate the wreath as you work, ensuring even distribution.
3. Layering: Once all your main flowers are fixed in place, fill in gaps with smaller flowers and greenery. This layering technique creates depth and visual interest, enhancing the overall look of your wreath.
4. Secure Additional Elements: If you’re using delicate flowers or decorations that need extra support, consider using hot glue for a more secure hold. Apply carefully to avoid excess glue showing through.
Tip:
Don’t rush through this process. Step back frequently to assess your work. A wreath is meant to be viewed from various angles, so ensure it looks appealing from all perspectives.
Step 4: Add Greenery and Accents
Greenery is an essential component in any floral wreath. It not only acts as a filler but provides a beautiful contrast to the vibrant colors of the flowers. Incorporate various types of greenery, spacing them throughout the wreath to create an organic look.
Instructions:
Begin by tucking in larger pieces of greenery around and between your flowers, securing them with floral wire.
Use smaller sprigs to fill in any gaps. The varying heights of different greens will add complexity and a natural feel.
After greenery is secured, take a look at your wreath. If it feels too “busy,” consider re-arranging or even removing a few accents.
Next, introduce any additional decorative accents. Ribbon can be used to create loops or bows, while natural elements like twigs or small pinecones can add an unexpected character. Arrange these accents strategically for the best visual impact, and secure them with wire or hot glue.
Step 5: Final Touches and Displaying Your Wreath
Your floral wreath is nearly complete, but the final touches can really make a difference. Step back and evaluate your wreath for balance in color, size, and texture. Make adjustments where necessary; swapping out a flower here or adding an additional piece of greenery there can elevate your creation.
Finishing Details:
Check for Stability: Make sure all elements are securely attached and won’t come loose as the wreath hangs.
Add a Bow: If you haven’t already, adding a ribbon bow can bring charm and an element of whimsy. Create a simple bow using a coordinating ribbon and attach it using floral wire.
Seal (if necessary): If using fresh flowers, consider lightly spraying them with a floral sealant. This can help them last longer, although it may not prevent wilting altogether.
Once satisfied with the look of your wreath, it’s time to display your masterpiece. Cascading flowers that frame the base should address how to hang the wreath and where. If you wish to hang the wreath on your front door, use a sturdy hook or a wreath hanger that complements your décor.
Storage Tip:
If the wreath is made with fresh flowers, you may want to hang it in a cool, shaded place to prolong its life. For artificial wreaths, store them in a cool dry place when not in use to prevent damage.
Creating a beautiful floral wreath is an enjoyable and straightforward DIY project that marks the arrival of spring. Whether opting for fresh blooms or quality artificial flowers, the process of selecting and assembling your materials allows for creativity and personal expression. By following the five easy steps outlined, anyone can craft a delightful wreath that reflects their style and enhances their home.
As seasons change, so can your wreath. Experiment with different themes and materials for each occasion, and let your creativity bloom. Gather your materials, tap into your imagination, and create a vibrant floral wreath that welcomes spring with open arms.